jueves, 8 de diciembre de 2016

Simple Http Server with Docker

1. Create a simple php file (index.php)


echo "This is an example"
?>

2. Create Dockerfile with the configurations

FROM php:7.0-apache
COPY src/ /var/www/html/
EXPOSE 80


3. Run de command to build the image in the cuurent directory
docker build -t example .

4. Run the command to expose the app through the port 8080 on the host machine
docker run -p 8080:80 example

5. to mount the volume run the command
docker run -p 8080:80 -v ~/projects/dockerExample/src/:/var/www/html/ example


martes, 10 de mayo de 2016

Routing with Angular2

1. Create a default template with the following tutorial http://festintecnologico.blogspot.com.au/2016/05/setup-of-environment-with-vs-code-for.html

2. Add  <base href="/">  before the body tag on index.html

3.Create a file named default.component.ts in the app directory with the following content:
import {Component} from "@angular/core"

@Component({
  selector:'default',
  template:'Welcome to Default Component'
})
export class DefaultComponent{

}


4. Create a file named first-example.component.ts in the app directory with the following content:
import { Component } from '@angular/core';

@Component({
  selector:'myTag',
  template:'This is a test'
})
export class FirstExampleComponent{

}


5. Open main.ts add

import {ROUTER_PROVIDERS} from "@angular/router"

and modify bootstrap to

bootstrap(AppComponent,[ROUTER_PROVIDERS]);

The file should look like:
import { bootstrap }    from '@angular/platform-browser-dynamic';
import { AppComponent } from './app.component';
import {ROUTER_PROVIDERS} from "@angular/router"
bootstrap(AppComponent,[ROUTER_PROVIDERS]);


6. Open app.components.ts

import the following libraries:
import {DefaultComponent} from "./default.component";
import {ROUTER_DIRECTIVES,Routes,Router} from "@angular/router";
import {OnInit} from '@angular/core';

Modify the template to:
template: `
<br />
<h1>
THIS IS AN EXAMPLE</h1>
<br />
<br />
<a default="" href="#" routerlink="">Default</a><br />
<a firstexample="" href="#" routerlink="">First Example</a><br />
<br />
<div>
<br />
<router-outlet></router-outlet><br />
</div>
<br />
`,

Set directives as:
directives:[DefaultComponent, FirstExampleComponent, ROUTER_DIRECTIVES]


Add a Route Decorator as
@Routes([
  {path:'/default', component:DefaultComponent},
  {path:'/firstExample', component:FirstExampleComponent}
  ])


Modify AppComponent class to:

export class AppComponent implements OnInit{
  constructor(private router: Router) {}

  ngOnInit() {
    this.router.navigate(['/default']);
  }
 
}

The file should be like:
import { Component } from '@angular/core';
import {DefaultComponent} from "./default.component";
import {FirstExampleComponent} from "./first-example.component";
import {ROUTER_DIRECTIVES,Routes,Router} from "@angular/router";
import {OnInit} from '@angular/core';


@Component({
  selector: 'my-app',
  template:
`
<br />
<h1>
THIS IS AN EXAMPLE</h1>
<br />
<br />
<a default="" href="#" routerlink="">Default</a><br />
<a firstexample="" href="#" routerlink="">First Example</a><br />
<br />
<div>
<br />
<router-outlet></router-outlet><br />
</div>
<br />
`,


  directives:[DefaultComponent, FirstExampleComponent, ROUTER_DIRECTIVES]
})

@Routes([
  {path:'/default', component:DefaultComponent},
  {path:'/firstExample', component:FirstExampleComponent}
  ])
export class AppComponent implements OnInit{
  constructor(private router: Router) {}

  ngOnInit() {
    this.router.navigate(['/default']);
  }
 
}


7. Finally use Ctrl+Shift+B to compile the code and F5 to run it


miércoles, 4 de mayo de 2016

Simple Example of Angular2

Note: If you are using Visual Studio Code, you can use Ctrl + Shift + B to recompile each one of the changes. The change will be automatically displayed on the browser.

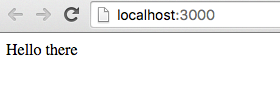
1. Create a new ts file with the following content

import {Component} from "@angular/core"
@Component({
  selector:"my-app",
  template:"Hello there"
})

export class AppComponent{}


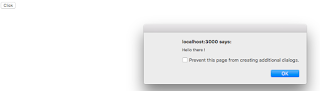
2. Lets try the click event

import {Component} from "@angular/core"
@Component({
  selector:"my-app",
  template:`
  <button (click)="sayHello()">Click</button>

  `
})

export class AppComponent{
  sayHello(){
    alert("Hello there !");
  }

}


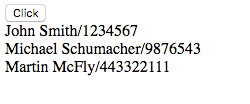
3. Lets try ngFor directive
import {Component} from "@angular/core"
@Component({
  selector:"my-app",
  template:`
  <button (click)="sayHello()">Click</button>
  <div *ngFor="#person of people" >
    {{person.name}}/{{person.phone}}
  </div>

  `
})

export class AppComponent{
  public people=[{"name":"John Smith","phone":"1234567"},
  {"name":"Michael Schumacher","phone":"9876543"},
  {"name":"Martin McFly","phone":"443322111"}]
  sayHello(){
    alert("Hello there !");
  }

}

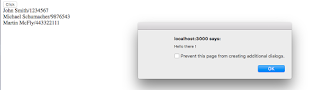
4. Lets add a click event per each one of the divs
import {Component} from "@angular/core"
@Component({
  selector:"my-app",
  template:`
  <button (click)="sayHello()">Click</button>
  <div *ngFor="#person of people" (click)="sayHello()">
    {{person.name}}/{{person.phone}}
  </div>

  `
})

export class AppComponent{
  public people=[{"name":"John Smith","phone":"1234567"},
  {"name":"Michael Schumacher","phone":"9876543"},
  {"name":"Martin McFly","phone":"443322111"}]
  sayHello(){
    alert("Hello there !");
  }

}


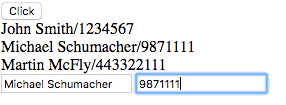
5.We can add edition per each one of the rows
import {Component} from "@angular/core"
@Component({
  selector:"my-app",
  template:`
  <button (click)="sayHello()">Click</button>
  <div *ngFor="#person of people" (click)="selectRow(person)">
    {{person.name}}/{{person.phone}}
  </div>
  <input type="text" [(ngModel)]="selectedPerson.name"/>
  <input type="text" [(ngModel)]="selectedPerson.phone"/>
  `
})

export class AppComponent{
  public selectedPerson={};
  public people=[{"name":"John Smith","phone":"1234567"},
  {"name":"Michael Schumacher","phone":"9876543"},
  {"name":"Martin McFly","phone":"443322111"}]
  sayHello(){
    alert("Hello there !");
  }
  selectRow(person){
    this.selectedPerson=person;
  }

}


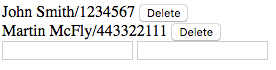
6. Now lets delete an element
import {Component} from "@angular/core"
@Component({
  selector:"my-app",
  template:`

  <div *ngFor="let person of people" (click)="selectRow(person)">
    {{person.name}}/{{person.phone}}
    <button (click)="deleteRow(person)">Delete</button>
  </div>
  <input type="text" [(ngModel)]="selectedPerson.name"/>
  <input type="text" [(ngModel)]="selectedPerson.phone"/>
 
  `
})

export class AppComponent{
  public selectedPerson={};
  public people=[{"name":"John Smith","phone":"1234567"},
  {"name":"Michael Schumacher","phone":"9876543"},
  {"name":"Martin McFly","phone":"443322111"}]
  sayHello(){
    alert("Hello there !");
  }
  selectRow(person){
    this.selectedPerson=person;
  }

  deleteRow(person){
    this.people.splice(this.people.indexOf(person),1);
  }
}


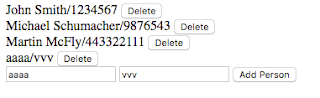
7. Lets add a new record
import {Component} from "@angular/core"
@Component({
  selector:"my-app",
  template:`

  <div *ngFor="let person of people" (click)="selectRow(person)">
    {{person.name}}/{{person.phone}}
    <button (click)="deleteRow(person)">Delete</button>
  </div>
  <input type="text" [(ngModel)]="selectedPerson.name"/>
  <input type="text" [(ngModel)]="selectedPerson.phone"/>
  <button (click)="addPerson()">Add Person
>      `
})

export class AppComponent{
  public selectedPerson={};
  public people=[{"name":"John Smith","phone":"1234567"},
  {"name":"Michael Schumacher","phone":"9876543"},
  {"name":"Martin McFly","phone":"443322111"}]
  sayHello(){
    alert("Hello there !");
  }
  selectRow(person){
    this.selectedPerson=person;
  }

  deleteRow(person){
    this.people.splice(this.people.indexOf(person),1);
  }

  addPerson(){
    this.people.push(this.selectedPerson);
  }
}

Setup of Environment with VS Code for Angular 2

1. Download Visual Studio Code from https://code.visualstudio.com/Download

2. Create a new directory named example1

3. Open Visual Studio Code

4. Open the directory with Visual Studio Code

5. Create the files tsconfig.json, typings.json, package.json, index.html,systemjs.config.js in example1 directory

6. Copy the contents of tsconfig.json from https://angular.io/docs/ts/latest/quickstart.html to tsconfig.json

7. Copy the contents of typings.json from https://angular.io/docs/ts/latest/quickstart.html to typings.json

8. Copy the contents of package.json from https://angular.io/docs/ts/latest/quickstart.html to package.json

9. Copy the contents of index.html from https://angular.io/docs/ts/latest/quickstart.html to index.html

10. Copy the contents of systemjs.config.js from https://angular.io/docs/ts/latest/quickstart.html to systemjs.config.js

11. Create a directory named app in example1

12. Create a file named app.component.ts with the following content or copy it from https://angular.io/docs/ts/latest/quickstart.html

import { Component } from '@angular/core';

@Component({
  selector: 'my-app',
  template: '<h1>Angular 2 Example with VS Code</h1>'
})
export class AppComponent { }


13. Create  main.ts with the following content or copy it from https://angular.io/docs/ts/latest/quickstart.html

import { bootstrap }    from '@angular/platform-browser-dynamic';
import { AppComponent } from './app.component';
bootstrap(AppComponent);

14. Save all your files


15. On Visual Studio Code click on Debug


16. Click on the Gear


17. Select Node.js as environment


18. Open View/Command Palette

19. Type Tasks: Configure Task Runner


20. Select TypeScript - tsconfig.json


21. Open a terminal or console and go into to the example directory

22. execute the command npm install

23. Open .vscode/launch.json

24. search for program into configurations


25. change the value to
"program": "${workspaceRoot}/node_modules/lite-server/bin/lite-server",


Note: you may need to run npm install -g typescript to execute typescript commands.

26. Open View/Command Palette

27: Type Task: Run Task

28. Select tsc

28: Run F5 to run the application


miércoles, 16 de marzo de 2016

Creating a Simple Angular 2 Example

1. Create a simple template(Download a template of angular2 with gulp from https://github.com/santiago762000/angular-2-env-setup)
2. run npm install to install all the required libraries
3. run npm start to start the service. It will open a browser window to test the application
4. open another window
5. run gulp
6. create a new file named first-example.component.ts
7. import the component library
    import {Component} from "angular/core"
8. Add a decorator
@Component({
  selector:'myTag',
  template:'This is a test'
})

9. Add a component class
export class FirstExampleComponent{
}

first-example.component.ts should be like:
import {Component} from "angular2/core"

@Component({
  selector:'myTag',
  template:'This is a test'
})
export class FirstExampleComponent{

}

10. Open dev/app.components.ts
11. Import FirstExample.component.ts
import {FirstExampleComponent} from "./first-example.component";

12. Add the directives property to @Component with an array of Components that will be used for app.components.ts
directives:[FirstExampleComponent]

13. Modify the template property to show tag
template: '',

app.component.ts should look like:
import {Component} from 'angular2/core';
import {FirstExampleComponent} from "./first-example.component";
@Component({
    selector: 'my-app',
    template: '',
    directives:[FirstExampleComponent]
})
export class AppComponent {
}

14. Check the opened browser on step 3:
http://localhost:3000/

sábado, 20 de septiembre de 2014

Using AngularJS to Load Some Photos from Flickr

For the following example we are going to review an easy example of AngularJS to consume
a Json String from Flickr.
We can summarise the process as:
A. Create an HMTL file with ng-directives
B. Use $http to connect to read data from a external server
C. Populate a HTML select element with data
D. Display an image from Flickr
For this example you may use Netbeans 8.01

1.Create a new HTML5 project named AJSFlickr and click on Finish


2. Add the following HTML to create the following GUI
<html>
    <head>
        <title>AJS Example</title>
        <meta charset="UTF-8">
        <meta name="viewport" content="width=device-width, initial-scale=1.0">
    </head>
    <body>
        <div>
            Image description:<input type="text">
            <button>Search</button><br/>
            <select>
                <option>select an option</option>
            </select><br/>          
            <img src="" alt=""/>
        </div>  
    </body>
</html>

3. Lets add angularjs script to the previous code and  add the following angularjs directives
data-ng-app:to initialise a AngularJS application
data-ng-model:to bind the HTML elements to dynamic data
data-ng-controller:to create a controller for the elements in the div.
data-ng-click: to perform a click on a button
data-ng-selected:to select an image from the select html element
data-ng-options:to add options for a select

<html data-ng-app="myAJSApp">
    <head>
        <title>AJS Example</title>
        <meta charset="UTF-8">
        <meta name="viewport" content="width=device-width, initial-scale=1.0">
    </head>
    <body>
        <div data-ng-controller="AJSFlickrController">
            Image description:<input type="text" data-ng-model="description">
            <button data-ng-click="searchImage()">Search</button><br/>
            <select data-ng-model="selectedImage" data-ng-options="image.title for image in images.photos.photo track by image.id">
                <option>select an option</option>
            </select><br/>          
            <img src="https://farm{{selectedImage.farm}}.staticflickr.com/{{selectedImage.server}}/{{selectedImage.id}}_{{selectedImage.secret}}.jpg" alt=""/>
        </div>  
        <script src="http://ajax.googleapis.com/ajax/libs/angularjs/1.2.15/angular.min.js"></script>
        <script src="myAJSApp.js"></script>
        <script src="AJSFlickrController.js"></script>
    </body>
</html>

4. Create a javascript file named myAJSApp.js
5. Create a javascript file named AJSFlickrController.js
6. Add the following code to myAJSApp.js to create a module to create a readable application
var app = angular.module("myAJSApp", []);

7. Add the following code to AJSFlickrController.js to use the text entered in the text element and call a function to retrieve the data from
Flickr and populate the select element.

app.config(function ($httpProvider) {
    $httpProvider.defaults.useXDomain = true;
    delete $httpProvider.defaults.headers.common['X-Requested-With'];
});

app.controller("AJSFlickrController", function ($scope, $http) {
    $scope.searchImage = function () {
        $http
                .get('https://api.flickr.com/services/rest', {
                    params: {
                        method: "flickr.photos.search",
                        api_key: "699982303118892e296bd349c4cc536e",
                        text: $scope.description,
                        format: "json"
                    }
                })
                .success(function (response, status) {
                    $scope.images = parseFlickrJson(response);
                });
    };
});

function parseFlickrJson(jsonstring) {
    var data = null;
    var jsonFlickrApi = function (d) {
        data = d;
    }
    eval(jsonstring);
    return data;
}


8. Open the page in a browser


viernes, 18 de julio de 2014

Creating a simple MVC App with Spring 4.0 and WebMvcConfigurerAdapter

1. Download STS(Spring Tool Suite) from http://spring.io/tools/sts

2. Create a new Spring Starter Project

3. Check the Web Options and enter a group(org.demo), artefact(exampleweb), and package name(org.demo.exampleweb).


4. Add the following dependences to pom.xml
<dependency>
<groupId>org.apache.tomcat.embed</groupId>
<artifactId>tomcat-embed-jasper</artifactId>
<version>7.0.54</version>
</dependency>
<dependency>
<groupId>javax.servlet</groupId>
<artifactId>jstl</artifactId>
</dependency>

Note: you may add the dependencies with the use of the Dependeces tab such as

For tomcat-embed-jasper:

For jstl


5. Add ViewResolver properties to application.properties in the src/main/resources directory
##View Resolver Configuration
spring.view.prefix=/WEB-INF/jsp
spring.view.suffix=.jsp

6. Create the following directories in your projects


7. Add a new jsp page named home.jsp. Use the following code for the JSP page
<%@ page language="java" contentType="text/html; charset=UTF-8"
    pageEncoding="UTF-8"%>

This is an example


8. Create a new class named MVCConfiguration in the package org.demo.exampleweb.config
and extend WebMvcConfigurerAdapter class


9. Override addViewControllers(ViewControllerRegistry registry) and add the following code


package org.demo.exampleweb.config;

import org.springframework.context.annotation.Configuration;
import org.springframework.web.servlet.config.annotation.ViewControllerRegistry;
import org.springframework.web.servlet.config.annotation.WebMvcConfigurerAdapter;
@Configuration
public class MVCConfiguration extends WebMvcConfigurerAdapter {

@Override
public void addViewControllers(ViewControllerRegistry registry) {
registry.addViewController("/").setViewName("home");
}

}

10. Run your App with Spring Boot App


11. Open a browser and enter localhost:8080 as URL